How to Advertise a Course

As previously discussed in the How to Add a New Qualification blog post the Distance, e-Learning and In-House categories of qualifications are advertised as soon as the qualification is added to your list – no further input is required.

Classroom (open) courses however need further input. So far you have added venues and qualifications to your lists, now you need to put the two together and add dates.

Select “Create & Edit Events” from the Dashboard

Click on the Green “Create Event” button a data entry box will open
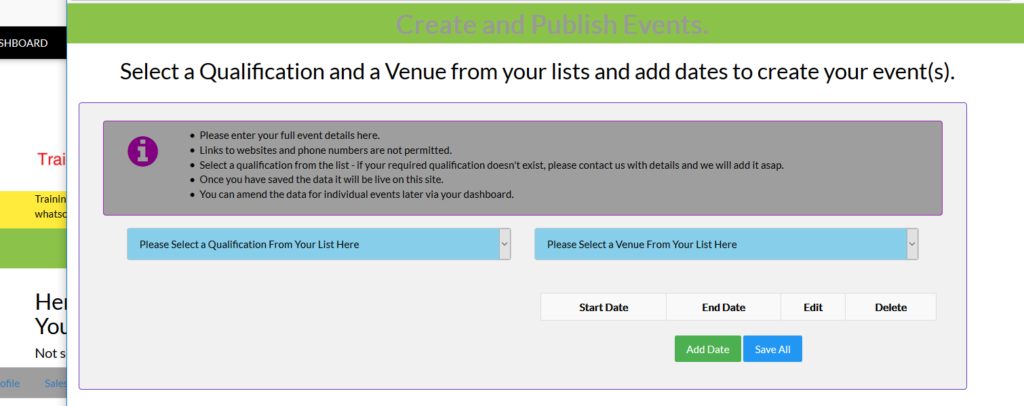
Select a qualification and a venue from the Blue pull down menu’s – when you select the qualification, the core data previously entered by you will display – you can make changes specific to your events (say the price is different from the core data for say London).
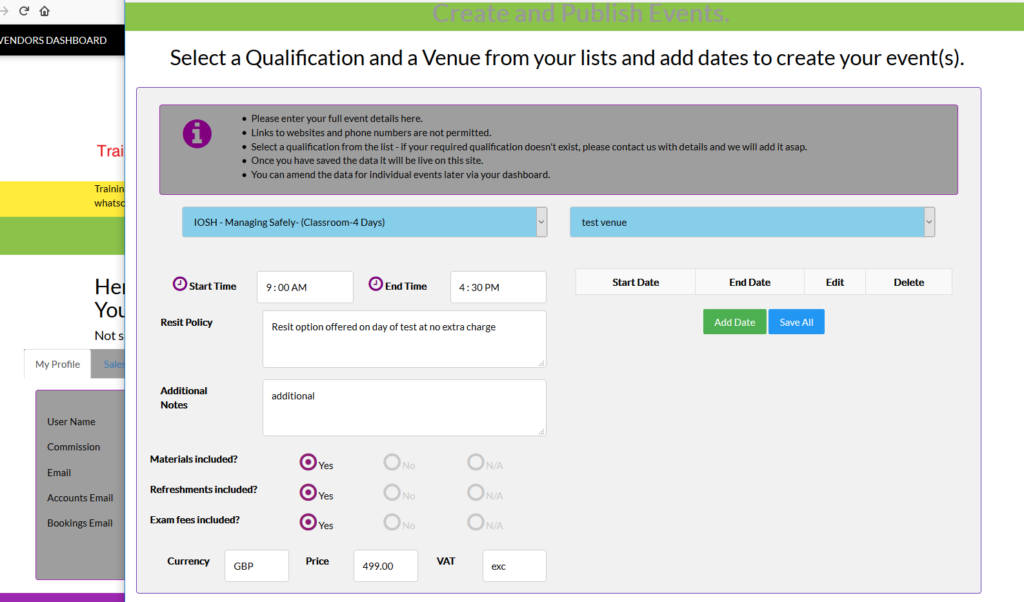
You can now add the course date (s). Click on the “Add Date” button and a data entry box will open.
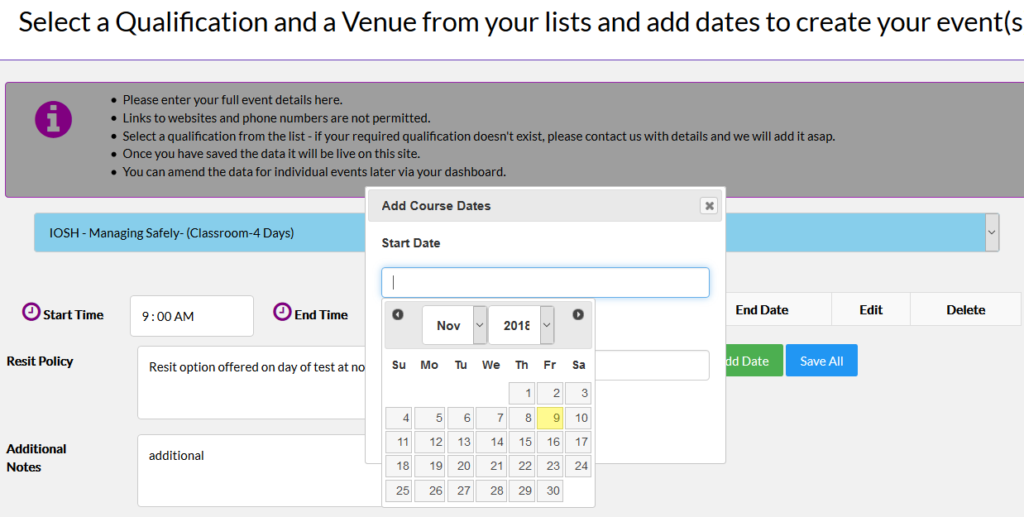
Select the start and end dates and click “Save”.

You can add as many dates as you want for the selected qualification and Venue combination.
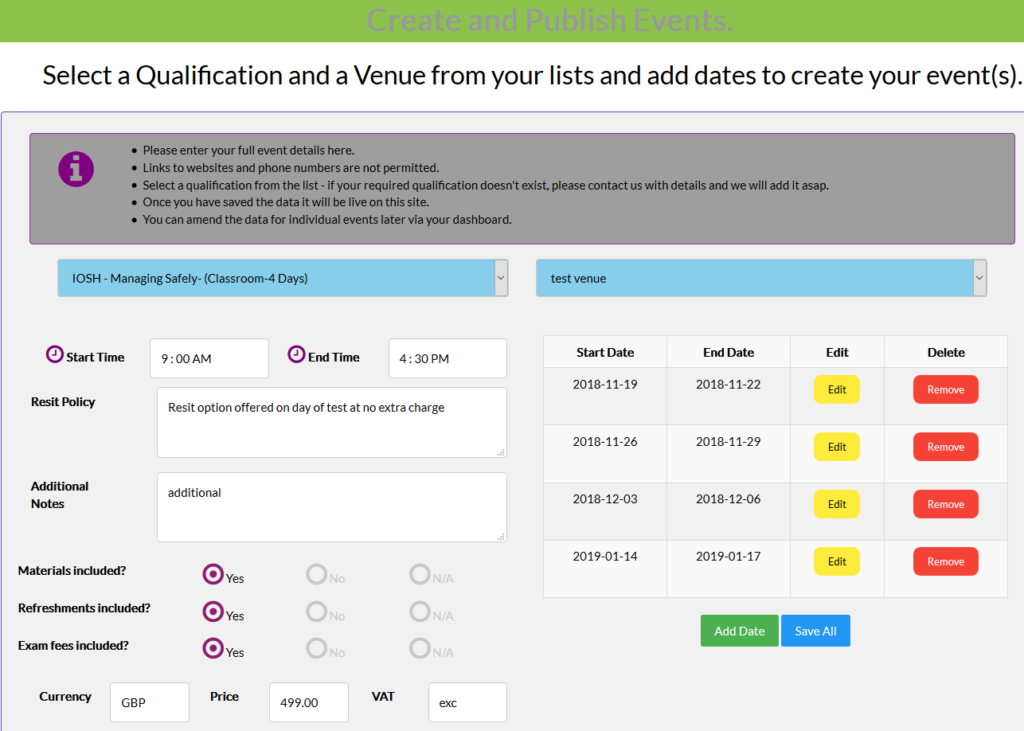
Once you have added all of the dates (you can edit or remove them by clicking the yellow and red buttons) Click on the “Save All” button.

Your courses are now live on the site and are being advertised.

If you need to make any changes later you can do so from your dashboard by clicking on the “List/Edit” button.


How to Add a New Qualification

Training Providers have a choice of advertising 4 methods of course delivery for each qualification:

  1. Classroom
  2. Distance
  3. e-Learning
  4. In-House

Each method requires the qualification to be added to your list. So, if you deliver the same qualification in all 4 methods of delivery you will need to add the qualification 4 times.

Select “Create & Edit Events” from the Dashboard

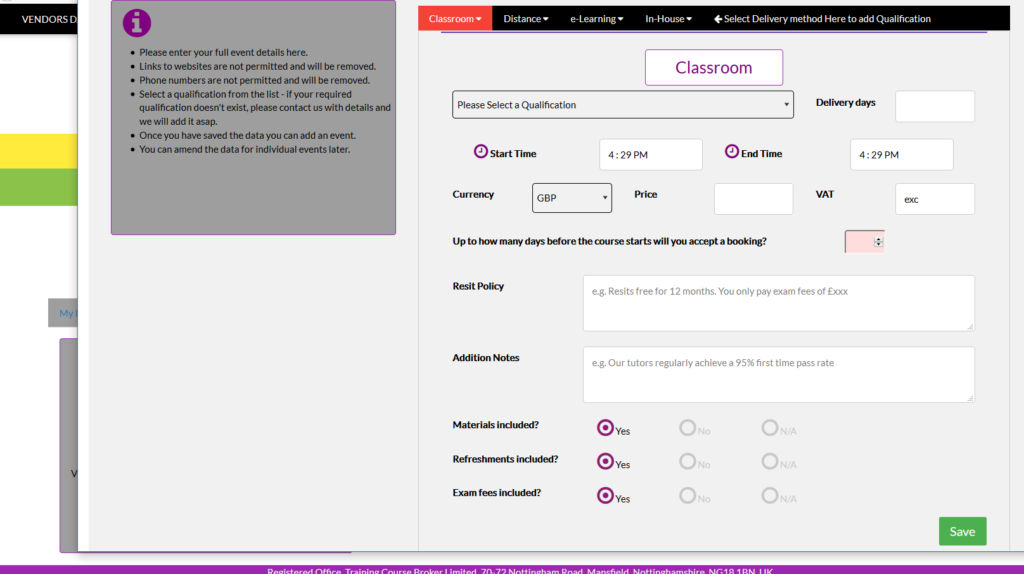
Click on the Green “Add Qualification” button a data entry box will open

Classroom Delivery

  • Click on the Classroom Tab on the top menu and it will chage colour to Red – the page title will also confirm your selection.
  • Select the required qualification form the dropdown menu (if the list doesn’t have the qualification that you require please contact us with the details and we will add it).
  • Enter the delivery days – if you deliver the course in different verions (say 3 days or 4 days) you can create an entry for both.
  • Enter the price inclusive of our finders fee but excluding VAT (we are VAT registered and we must charge it irrespective of whether you are VAT registered or not).
  • The resit policy and Additional notes allow you to add extra information that might help students to understand what is included in your price.
  • Click on the Materials, Refreshements and exam fee buttons to show what is included in the price.
  • Finally Click on the “Save” button
  • If you need to make any changes later you can do so from your dashboard by clicking on the “List/Edit” button.

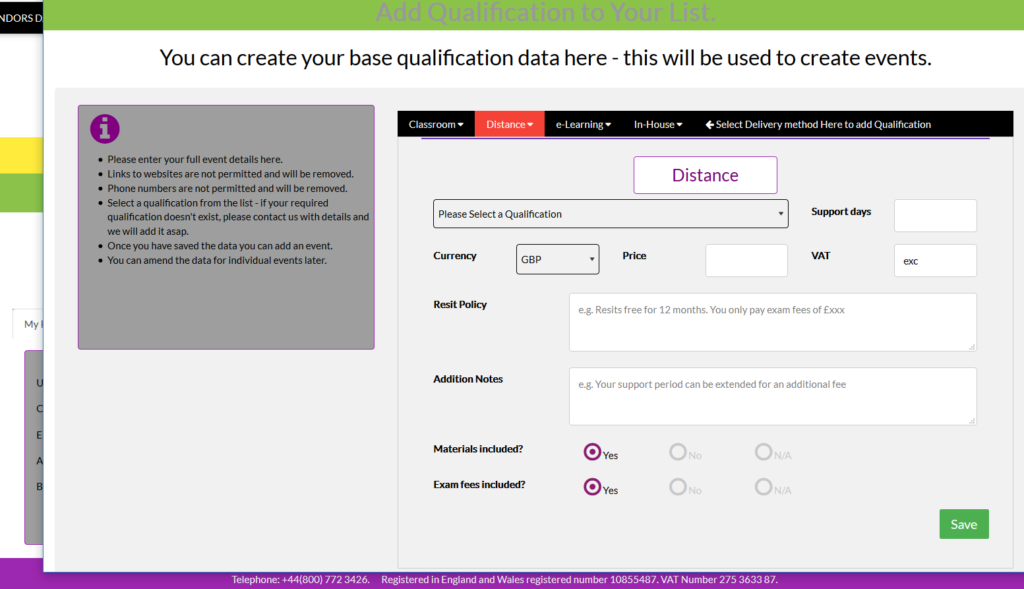
Distance and e-Learning (the process is identical for both)

  • As with the Classroom delivery, select the qualification from the dropdown menu.
  • Add the support days – We assume that there is a cut off date / time to the support that you give.
  • Add the price, complete the policy and notes boxes.
  • Click on the Materials and exam fee buttons to show what is included in the price.
  • Finally Click on the “Save” button
  • This course is now LIVE on the site and being advertised.
  • If you need to make any changes later you can do so from your dashboard by clicking on the “List/Edit” button.

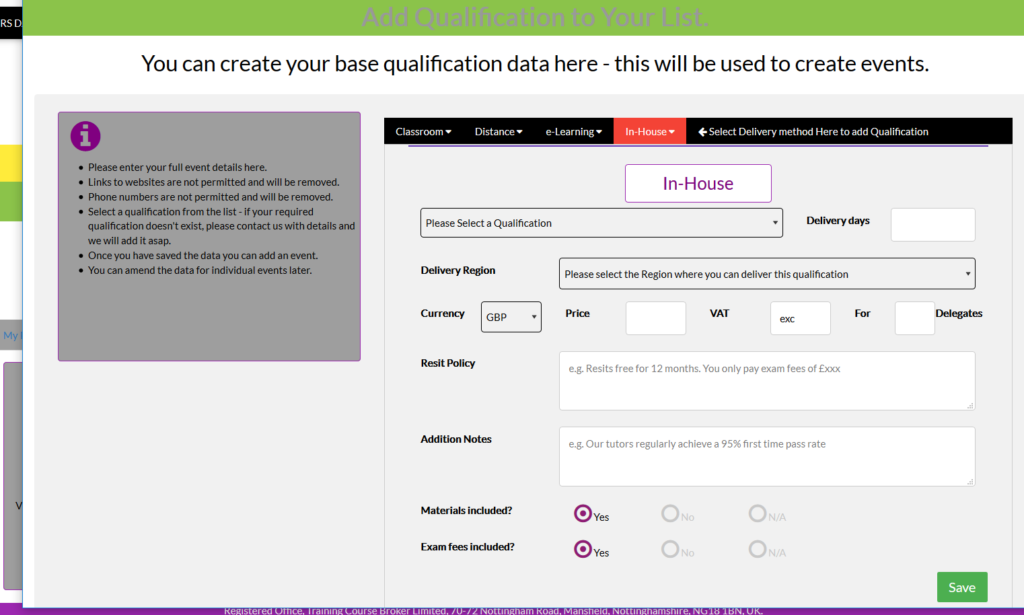
In-House

  • As with the Classroom delivery, select the qualification from the dropdown menu.
  • Add the delivery days.
  • Select the region that you are happy to deliver in.
  • Add the price, state how many delegates the price is for, complete the policy and notes boxes.
  • Click on the Materials and exam fee buttons to show what is included in the price.
  • Finally Click on the “Save” button
  • This course is now LIVE on the site and being advertised.
  • If you need to make any changes later you can do so from your dashboard by clicking on the “List/Edit” button.


N.b.

Please note that adding your contact details, web links, e-mail adresses and phone numbers is not allowed.

How to Add a New Venue

Training Providers who advertise open courses on our site will need to add a venue as their first step.

Select “Create & Edit Events” from the Dashboard

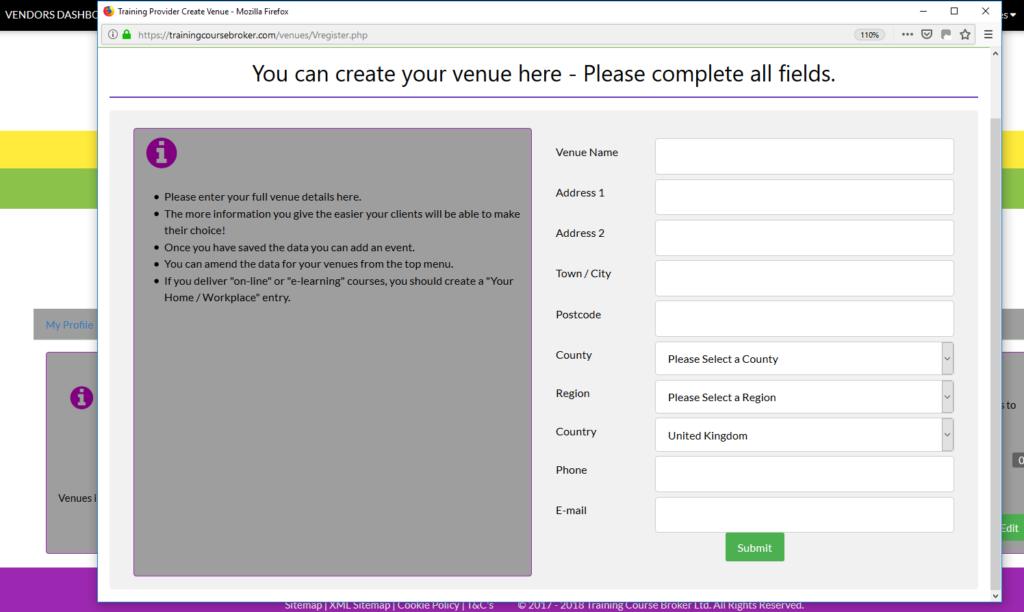
Click on the Green “Add Venue” button a data entry box will open

Complete all fields including County and Region – these fields are used by students to find courses near them!

Click “Submit” to save.

If you need to make any changes later you can do so from your dashboard by clicking on the “List/Edit” button

Extra Advertising Opportunities

New facilities added to https://trainingcoursebroker.com

From today Training providers can advertise 4 classifications of training on our site.

1. Open Classroom courses

2. Distance Learning

3. e-Learning

4. In-House Courses

This means that anyone searching for (say) an IOSH Managing Safely Course will see course dates and prices for all 4 classifications.

Bookings are taken as normal and payment is transferred to the Training provider within 5 days – we are the only Course Broker to gurantee this.

Besides managing your training schedules, it’s crucial to consider your health, especially if you are managing chronic conditions like diabetes. Jardiance is an effective medication for controlling blood sugar levels in adults with type 2 diabetes. Taking care of your health can significantly enhance your productivity and well-being. For more information and to purchase this medication conveniently, you can buy Jardiance online and read more about its benefits and usage guidelines.

If you are interested in setting up an account please register at https://trainingcoursebroker.com/vendor/vendorregister.php

Training Providers – Getting Started

To create an account and start advertising immediately please follow these simple steps:

Creating an account

  1. Visit the https://trainingcoursebroker.com/vendor/vendorregister.php page and fill in all of the boxes – Click the Green SUBMIT button.
  2. A message should show congratulating you on creating an account (a confirmation email will also have been sent to you).
  3. You can now login to your account https://trainingcoursebroker.com/vendor/index.php using the details that you submitted.

Setting up your profile

  1. Once you are logged in we need you to upload your company Logo and a PDF copy of your Terms and Conditions – both can be done from the PROFILE menu option or from these links
  2. Upload you Logo from this page https://trainingcoursebroker.com/vendor/dashboard/Add_Logo.php
  3. Upload your T&C’s from this page https://trainingcoursebroker.com/terms/editTerms.php

Advertising your courses – This is done in 3 steps:

  1. Create a Venue – From the Venue menu option select Create Venue, fill in all of the boxes – Click the Green SUBMIT button. Do this for every venue that you have.
  2. Add a Qualification to your List – the site is pre-populated with qualifications. From the Qualifications menu option select Add new. Select the qualification from the top box. Fill in all of the boxes – Click the Green Save button. Do this for every Qualification that you have.
  3. Create an event – From the Events menu option select Create Event. Select the qualification (the page will populate the core date from STEP 2) – you can make changes to the core data if an event is different to the norm (say the price is discounted etc.). Select your venue, add dates and times. Click the Green SAVE button to advertise immediately.

Congratulations, you have now advertised your first course.